Monday, August 15, 2011

Dirty Jobs


Before I whine about filleting here are a few pictures before and after with the transom.


The repair to the cracked hull can be seen here on the left of the keelson at the base of the bulkhead.


Here is the complex corner where the transom meets the hull and sides.


The transom fit beautifully although I will admit that until the moment I positioned it in place I doubted it would fit that shape of space.  It did.


So next I got my introduction to filleting.  It initially was awful.  My fillets were sticky and pockmarked but with time they became better.  I have about a 2 hour window in the mornings when my garage goes below 90 degrees and I can do my epoxy mixing.


Fillets near transom


Messy fillet over keelson. It looks like I had a food fight!
 
This fillet started out awful.  It's where the keelson meets the transom.  The hull is so flat here that I was afraid that the fillets would be too thin as a result.  So I ended up filling in that whole strip and making it one big fillet.  It was one area wher I was able to lay on the fiberglass cloth before the fillet cured and it turned out to be a large but very smooth and solid joint.
Sanding these joints is awful so the motivation grows to make succesive fillets smoother.  I found that my Rockwell multitool mwith the triangular sanding pad worked great in those hard to reach corners.


After too many hours of sanding it was time to lay down the fiberglass
Laying out before epoxy


After epoxy- look closely and you can see the overlaps.


Next I will sand the rough spots, feather in the fiberglass seams and apply another coat of epoxy.  Then address the breasthook, cleats for the cockpit seats and the cabin floor.
STAY TUNED


Still On Track Despite some Setbacks

A few things came up since my last post but construction has continued.  My mother died in early March so I had to go to Maine for the funeral and such. Then 2 weeks later my wife served me divorce papers.  I haven't felt much like blogging until the dust settled some.
The seperation is amicable and we're trying to split things 50%.  But when it came to the house or the half -finished Pocketship she chose the house!  Can you believe it?  And she supposedly has a good lawyer.


My last post spoke of the trouble I had joining the sides to the bottoms and the gap that was left. (see previous pictures). 


Well it just didn't sit right with me since all other parts fit so well.  I pondered and pondered and soon figured out the problem.  I had put the sides on BACKWARDS!!  Port bow at the srarboard stern, though a close fit, just didn't cut it.  Luckily I had only wired the pieces and it was an easy fix to flip the sides around to their correct place and guess what?...  Everything fit!

I've been able to continue construction but because of the weather I'm a bit limited.  My garage is not air-conditioned so when it's 105 degrees outside it's ugly in the work area.


Here is a shot of bulkhead 2 and the floors ready to install.


HAD A MISHAP!

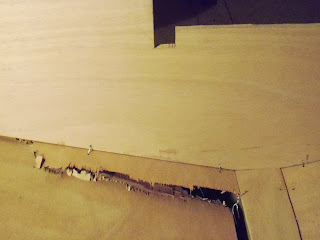
This is a picture of where my knee slipped of the keelson onto the hull bottom.  The weight tore a seam in the hull.  I thought about crying when that happened.  All I could imagine was having to remake the entire hull bottom.  Instead I took 2 pieces of plywood, one inside the hull, one on the underside of the hull, laid some thickened epoxy in the crack and screwed the two peices of plywood together like a sandwich. See below. 


Underside
 

Inside Hull
(plastic between wood and
epoxy to prevent sticking)
Note the screw holes in one area -
they surround the crack only

Here is the "finished" product after taking off the sandwich, before sanding.

It pulled the cracked edges together nicely and, once cured, a little sanding left it almost as good as new!  I believe I dodged a bullet this time.
Once this was repaired all of the floors and bulkheads went in without a hitch.  Next comes the dreaded filleting.

Thursday, February 17, 2011

Trying to pull it together- unwieldy hull seams

Once the hull and sides were stitched together I realized that I had a problem.  A 36" stretch just aft of the bow did not come tightly together.
This is a shot of the hull and side seam on the port side approximately 18" back from the bow.  There is a gap of about 3/8" between the pieces.  At the bow these 2 pieces touch and then there is a widening gap for about 3 feet and then the pieces approximate nicely the rest of the way to the stern.  I couldn't figure what went wrong or how to pull those pieces together (the starboard side has a similar gap but a bit wider at its widest at about 5/8"!). 
So I called CLC and Joey got on the phone.  Those guys are great.  Although, obviously, he has little experience building the pocketship, he has built boats.  So we brainstormed and we (O.K.- he) came up with a solution.  I drilled these 2 blocks onto either side of the widest area of the gap.


 This is a picture of the inside of the hull.  These are blocks that I drilled on the inside  to avoid rip out on the plywood.


I then put a C-clamp on and slowly tighened it down.  And sure enough it slowly came together!


This is shown partially tighened down but the gap is still present on the left.  This picture is a bit decieving.  The gap looks bigger than it actually is.  The dark line is actully the end edge of the hull piece.  The gap was approx. 1/16 " when finished but the edges did't line up exactly. so I needed more help.

 This picture shows the jig as suggested in the manual to pull the edges flush.  The pictures don't show it so well but the edges lined up nicely and are ready for filleting.  The starboard side will be a bit more of a challenge since its gap is wider.
The bulkheads and floors need to be finished and installed then I'll be ready to tackle the dreaded filleting.

Stay Tuned!

Tuesday, February 8, 2011

A Hull of A Week


Now that the hull panels are together I moved to the sides.  I'm not using a kit
and I tend to cut out pieces as I need them.  Here are a couple "floors" being epoxied.  Yes, that's my kitchen table.  It's been unusually cold here and somehow I talked my wife into letting me do these indoors one night since I was concerned about the curing time.  There is no smell so it was not obtrusive although we noticed that our goldfish and hamsters died mysteriously that night (just kidding).


Putting on the sides is definitely a job that would be easier with 2 people.  I was alone.  And trying to clamp the panel to the cradle while stitching was fruitless.  But it came together, with a little patience.


The bow took some wrestling put it slowly drew together and seems symmetrical.  Note the wires bent back on themselves.  My hands and arms look like I own a cat (I don't) from all the wire scratches and stabs.  I decided to bend back the ends after excessive blood loss.


This shows the inside edge of the starboard side towards the bow.  If you look closely you'll see the seam has not closed adequately yet.  I haven't yet figured out how to pull it together.  The wire doesn't seem strong enough at this point.  I've broken several overtightening.  I may need to recruit a strong neighbor.


This is floor 4 in place ready to be stitched


The view from the open stern.


Here she is peeking her nose out the garage
So now I need to cut, finish and install all "floors" and bulkheads.  Then I can work on the transom and begin filleting.  I'm amazed at each step how all of this is fitting together.  Things appear to be symmetrical and edgeds seem to be meeting the right edges.  It may sail yet!

Friday, February 4, 2011

Take a Bow

It's now time to join the fore edges of the hull panel.  A word of caution-  I tried to bend the bow pieces while dry (the wood was dry too) and while trying to be clever I clamped a C-clamp on the edge to use as a lever to bend the wood.  It was also easier to grip than the wood itself.  The edges became closer as I bent them and were just about touching when I heard a crack!  One of the sides got a small crack as I torqued it too much.  As it turns out, the crack was not critical but I cringed to think what I would have faced if I cracked the hull significanrtly.  So be gentle!  And that's why I then chose to wet the wood.
The manual suggests wetting the wood that needs to bend but doesn't mention how.  I just draped the wood in towels and poured hot water over them several times for 10-12 minutes.

 This is a closer look.  You can see the water dripping into the crease and keelson.  Luckily, my driveways is a slight incline, so the water dripped onto the driveway and out to the street.  If you use this technique, plan ahead with what to do with the dripping water.


The picture on the left (below) shows my first attempt after soaking the wood.  The edges got close but not there yet.  This is a job where another set of hands would have been very helpful.  I soaked the wood again and then tightened the wires and it pulled together nicely (picture on right).  The edges don't look like they're together but in fact the back corner edges are touching and the forward edges are not, as designed. I was pleased that the edges lined up nicely and the port edge was at the same height as the starboard edge.


This shows wet wood after towels.  It was over 75 degrees that day so it dried fast.


Below and right are pictures of the hull finally starting to look like a boat


You can see floor 4 in place in this picture but it has not been attached yet


I followed the advice of a few before me and put the cradle on wheels.  I had a furniture dolly
so I removed the wheels and attached them to the cradle.

 What a difference when moving the project.  I would recommend it to all.  I had mentioned that my driveway is on an incline and last week I moved the hull out on the driveway and it started moving on its own, downhill!  I was able to wrangle it with a little muscle but my boat almost took its first journey without me.

Okay- next is finishing the floors and bulkheads.  I hope to attach the sides this weekend.

Monday, January 24, 2011

Revenge of the Keelson

Well, I've been scratching my head for the past few days about a construction problem.  I've layed the hull pieces and stitched them to the keelson.  I spoke, in the last entry, of my crooked tip on the keelson.  It seems to have straightened itself a bit during the stitching process.  So all is proceeding well.  I cut Floor 4 and laid it in its position and found that it was too tall.  That is, it did not fit snugly under that chin at the curved corner of the trunk.  It sat about 1/4" too tall.  And the tab at the bottom sat precariously on the floor.
That was 3 days ago and I kept walking by it, while doing other tasks, and wondering where I could have measured wrong.  I have been so careful transferring the plans to the wood.  I was busy with other tasks so I didn't need to allot much thought to that problem.  But as I draw closer to its installation I have begun to ponder how to remedy this problem. Do I need to trim the top edge?  Cut a bit off the tab at the bottom?

Then the light bulb came on.  The little tab at the bottom center of Floor 4 is supposed to fit in the opening between the trunk and the keelson.  Here I thought that space was either bad measuring on my part or (bite my tongue) designed as so.  During keelson installation there is no mention that the square opening cut in the keelson, to slip over the trunk, is cut longer than the trunk for a reason.  When installed correctly the opening will be snugged up to the aft end of the trunk leaving a gap of about 6 mm(I should have been suspicious) at the for end of the trunk.  Just enough space into which that tab on Floor 4 can fit.  Duh!!!

I had left, only by pure luck, a gap of about 4 mm.  So I decided to shave a bit of the tab so it would fit in the gap mortise and tenon-like.
 I used my Japanese Pull Saw to trim the tab and momentarily felt like a fine craftsman until I cut my finger.
 It's a bit difficult to see but the tab slid nicely into the slot and the top edge fit snugly under the chin of wood on the curved corner of the trunk.
It felt good to solve a problem which 3 days ago was just a big question mark.

I'm currently glassing the inside surface of the sides to prepare to install them to the hull panels.  It's not easy finding room in my small garage for these two 15' panels.  I have to do a mild limbo to move in certain areas of the ngarage.  Progress is a bit slow because it's been staying well below 60 F. in the evenings so I can only use epoxy on the weekends when it's a bit warmer.  I should clarify that it is not warmer here on weekends.  On weekends I can work when the sun is out and > 60 degrees.
I've yet to pull the bow edge of the hull together yet.  That may take a little more problem solving. If I need to wet the last 24" inches as suggested in the manual I'm not sure how something like that is accomplished.

Monday, January 17, 2011

From Cradle to Wave


O.K.- the title is a groaner but I needed something that worked with cradle.  I built the cradle out of cheap wood due to its short life.  I had my 19 yr. old son help me hoist the keel into place, but the square slots on the cradle were a bit tight and the keel did not fit.  We lifted it out, I widened the openings and it then fit fairly well.  I decided to check its plumbness (if that's a word).  With a level I determined that the center trunk was tilting slightly starboard.  I was using the cement garage floor as my horizontal.  After measuring from all angles and directions I determined that the keelson was not exactly perpendicular to the keel and trunk.  Very close but not exact.  But worse was the way it was seated in the slot for the keel.  This allowed too much play and threw the vertical slightly more off plumb.  My solution was to drive a flat wedge (a left over scarf joint!) between the keel and the cradle slot to tilt it back to almost plumb.


So far so good but when I placed the hull pieces in the cradle for a trial fit it was less than satisfactory. 3 of 4 cradle arms were too narrow to accept the hull.  Do they all need to be recut?  Yikes!


Here are some trial fits.  I did a few stitches aft on the port side to steady the boards and then I need to do a series of measurements from different surfaces to determine the symmetry of port and starboard.  I believe I was very careful transferring the plans of the cradle arms.  It doesn't yet make sense why some fit and some did not.
Stay tuned for my decision of how to best move forward.  I am assuming at this point that it's a good idea to
have symmetrical hull halves.

Holidays and Boatbuilding

Well, it's been a while since my last entry.   The holidays and moving kids (and all their stuff) to college has consumed a lot of time in the past month.  Boatbuilding continued, albeit more sporadic, but blogging just didn't take priority. 

I've made some progress since last blog and had to repair a few mistakes.  Still a long ways to go.

Here is my first dumb mistake.  Yes, that's the tip of the keelson lying askew. After thinking I was being so careful every time I moved around that exposed tip and instead I broke off the tip. I was moving the whole keel and kaboodle, one morning, into the driveway to make room for scarfing those long pieces.  During the move it hit the front of my car ( I was intently focused on the stern so it would clear obstacles), I heard a crack and knew exactly what I did.  Bonehead!!


As a resolution, and when the sobbing ceased, I had to manufacture a new tip.  So I scarfed the remaining end of the keelson and fashioned a new tip.  It was a bit tricky clamping it up (since it is not laying on the ground) but it cured and held tight.  After unclamping I noticed the tip bends slightly port so I don't yet know if this will significantly affect the bow alignment.  I may have to refabricate a new one yet.


Next chore was to join the pieces soon to become the hull bottom and sides.  My scarfing is getting better with practice.  Below are 4 panels I did simultaneously.  Multiple panels actually make the job easier and more accurate.  I used a traditonal block plane for most of the wood removal, followed by a palm block plane to do some finishing and then a quick once over with the sander.


Below they are ready for gluing.  The tape was an idea I stole to help with cleanup afterwards.  It helped some.


This is after gluing.  After peeling off the tape most of the goop shown along the joint goes with it.  It saved some sanding as a result.  Frankly, I've found that a heat gun and a putty knife worked very nicely. The epoxy just blows away as you heat and peel it and minimal sanding is required.

With the tape off

Laid out the hull and cut 2 pieces at once (carefully) to assure symmetry.
The circular saw did a nice job following the gentle curves of the hull

After cutting close to the lines I finished the edges with the block plane and some orbital sanding and got them to almost perfect.  I'm being so careful with the cutting as I envision a boat that won't steer left or can fit more people on the port side than starboard.  So I really am taking my time (very out of character for me but one reason I chose to take on this project). 
Next I'll show construction of the cradle and hull assembly.